Before you start #
Porting maps from Goldsrc to Source is not easy. Depending on the complexity of the map, be prepared to invest anywhere from 3 to 50+ hours into a single port. Prior experience with Valve’s Hammer Editor is helpful, however porting maps is entirely doable without ever having used Hammer before.
This guide was primarily written in July of 2025. There is a small number of people who occasionally work on tools for the GoldSrc porting process, so depending on when you are reading this there may be some new ways to make the process easier. Search the web or ask in the Momentum Mod discord and you might find something useful.
Necessary software #
Hammer++ #
Download: https://ficool2.github.io/HammerPlusPlus-Website/ While technically any version of Source Hammer can be used, Hammer++ is recommended as it offers tools to speed up the porting process (e.g. brush merging, names of entities in the entity report).
J.A.C.K. #
Download: http://jack.hlfx.ru/en/features.html J.A.C.K. is an alternative to GoldSrc Hammer with new features and abilities. You likely will not need these, but J.A.C.K. is still preferred over default GoldSrc Hammer as J.A.C.K. is able to open .map files that default GoldSrc Hammer cannot.
VTFedit #
Download: https://github.com/NeilJed/VTFLib VTFedit is a texture editing program that is generally useful for Source mapping. This is the primary tool for converting GoldSrc textures into a format compatible with Source.
Make sure you are using version 1.3.3 or older of VTFedit! While no longer maintained by its original author, newer forks of VTFedit have removed to ability the convert .wad files.
Optional software #
SLADE #
Download: https://slade.mancubus.net/index.php?page=downloads SLADE is a software primarily used for DOOM modding, but it is useful for porting as it lets you remove individual textures from a .wad file. This is important as occasionally when attempting to convert a .wad file the conversion will stall on a certain texture. If this happens SLADE allows you to remove the problematic texture.
CompilePal #
Download: https://github.com/ruarai/CompilePal/releases While not necessary for porting, if you are new to Source mapping this is the best way to compile your .vmf files into playable maps. Compiling through CompilePal allows you to keep working on the .vmf file while compiling, and this tool also automatically handles packing textures, models, and other custom content the map uses.
Crowbar #
Download: https://steamcommunity.com/groups/CrowbarTool Crowbar is a convenient tool to compile, decompile, and view Source and GoldSrc models. You only need this software if you will be porting any models with your map.
GoldSrc2Source - Map Fixer #
Download: https://www.moddb.com/games/half-life-source/downloads/goldsrc2source-map-fixer A mapping tool that you can use to automatically fix certain issues that arise in the porting process. It is capable of adjusting textures, updating Spawnflags, and replacing old GoldSrc mapping logic with Source’s new I/O connections logic. Read the download page for more information. Unfortunately this program is not perfect, and some of its “fixes” do not actually help you finish porting a map.
Half-Life Texture Tools #
Download: https://github.com/yuraj11/HL-Texture-Tools/releases This software allows you to preview the textures contained in a .wad file. If you do not use HUSK MD this software is capable of extracting .wad files packed into a .bsp file.
BSPTexRM #
Download: https://github.com/Litude/BSPTexRM/releases/tag/v1.0 This tool removes the bitmap entries from the textures lump of a map. The texture entries themselves are preserved. It is very unlikely you will need this tool. In rare circumstances however running a .bsp through this tool can be the difference in whether or not it will decompile.
Starting the port #
Download the .bsp and (in some cases) the .wad #
If you do not already have a map in mind, here are some websites with thousands of GoldSrc skill maps to look through:
Maps downloaded from the above sites come as a .zip archive with several different files inside. The .bsp file is the map itself. Usually custom textures will be packed into the .bsp, but sometimes they will be included in the .zip file separately as one or multiple .wad files. These are the two types of files you need to start porting, but save any other files inside the .zip archive.
The other files in the .zip are custom sounds, skybox, models, etc. and will be used later in the porting process. Additionally there is often a .txt file by the map’s author providing a description of the map.
Obtaining the .map file #
You will need the .map or .rmf file for the map you wish to port to Source. It is much easier if the map’s author can give you the original .map or .rmf file. Assuming you cannot acquire the original file proceed to the next step.
What decompiler to use? #
There are five decompilers available for GoldSrc maps. They are listed from best to worst as follows:
- Half Life Unified SDK Map Decompiler (HUSK MD)
- Modified BSP Converter (MBSPC)
- Windows BSP Converter (WinBSPC)
- BSP Viewer (BSPV)
- BSP2MAP
Goldsrc does not store original brush geometry in its .bsp files like Source does, and as a result decompiles will be messy. The geometry will be generated with an excessive amount of brushes in a way that no human would ever make.
The two methods of decompilation can be described as “Tree-Based” and “Face-To-Brush”. Tree-Based decompiles or the “cube” generate map files that appear as if the map geometry is carved out of the center of a cube. While not easy to work with when trying to modify the geometry of a decompiled map, the Tree-Based method is the better of the two. This is primarily due to how this method prevents leaks.
Face-To-Brush decompilation converts every single brush face into its own separate 1 unit thick brush. This method is the worse of the two due to the following reasons:
- Texture z-fighting on every convex corner
- Dozens of leaks
- Generated map files typically exceed the Hammer brush limit
In almost every case a Tree-Based decompile is better to work with.
More information on this is available on the release page of HUSK MD.
Half Life Unified SDK Map Decompiler (HUSK MD) #
Download: https://github.com/SamVanheer/HalfLife.UnifiedSdk.MapDecompiler
This is by far the best decompiler to use. It cannot be reiterated enough that any attempts at porting GoldSrc content should start with this decompiler. The majority of other information available on GoldSrc map porting is outdated. Old guides will typically point to WinBSPC or BSP2MAP, but these tools are functionally obsolete.
This decompiler has the following advantages over the other options:
- Offers both Tree-Based and Face-To-Brush decompiles
- In active development
- Modern GUI
- Rarely if ever crashes when attempting to decompile
- Customizable decompile options
- Can automatically extract embedded textures
Modified BSP Converter (MBSPC) #
Download: https://gamebanana.com/tools/6565
While lacking some of the features of HUSK MD, MBSPC is still serviceable. Decompiles with this tool give similar results to those of HUSK MD.
The pros and cons of this decompiler are as follows:
- Exclusively Tree-Based decompiles
- Last updated in 2012
- No GUI, command line only
- Rarely if ever crashes when attempting to decompile
- Customizable decompile options
- Does not automatically extract embedded textures
Windows BSP Convert (WinBSPC) #
Download: https://gamebanana.com/tools/download/5030
The original Tree-Based decompiler for GoldSrc. Functionally obsolete with the existence of MBSPC and HUSK MD.
The pros and cons of this decompiler are as follows:
- Exclusively Tree-Based decompiles
- Has not been updated since the early 2000s
- Has a GUI
- Prone to crashing and failing to decompile maps
- Customizable decompile options
- Does not automatically extract embedded textures
BSP Viewer (BSPV) #
Download: https://nemstools.github.io/pages/BSP_Viewer-Download.html
The precursor to Crafty, both these programs are stand alone tools that are capable of loading and viewing BSPs without having any game open. BSPV is capable of Face-To-Brush decompiles, but this feature was removed in Crafty.
The pros and cons of this decompiler are as follows:
- Exclusively Face-To-Brush decompiles
- Has not been updated since the early 2000s
- Has a GUI
- Rarely if ever crashes when attempting to decompile
- Decompiles are almost always thousands of brushes over Hammer’s limit
- Prone to generating spaghetti
- Limited decompile customization options
- Does not automatically extract embedded textures
BSP2MAP #
Download: https://www.moddb.com/games/half-life/downloads/bsp2map1
The original GoldSrc decompiler. This tool really should never be used at this point as BSPV and HUSK MD provide better results for Face-To-Brush decompilation.
The pros and cons of this decompiler are as follows:
- Exclusively Face-To-Brush decompiles
- Has not been updated since the early 2000s
- Command line only, no GUI
- Decompiles are almost always thousands of brushes over Hammer’s limit
- Does not typically crash when decompiling
- Prone to generating spaghetti
- Limited decompile customization options
- Can extract embedded textures
Decompiling with HUSK MD #
This guide will only cover decompiling with HUSK MD. If you are intentionally using any of the other decompilers you must have a good reason and thus know what you are doing.After downloading the program, open MapDecompilerGUI.exe in the HalfLife.UnifiedSdk.MapDecompiler folder. You can configure the options to your liking if you know what you are doing, otherwise the settings in the image below are recommended.

With the settings configured go to the File menu in the top left and select Convert. Pick the map you want to decompile and the conversion will begin. When the program finishes, a .map file will be generated along with a .wad file containing any packed custom textures.
Converting the textures #
Now you will need to collect all the .wad files your map uses textures from. You should have all the textures your map uses either from the .wad file generated by HUSK MD or from the downloaded map’s .zip file.
If you find yourself missing any additional textures they are likely Valve textures from Half-Life or Team Fortress Classic. The proper way to acquire these textures is to locate halflife.wad, tfc.wad, and tfc2.wad. These .wad files can be found in Steam/SteamApps/Common/Half-Life/valve and Steam/SteamApps/Common/Half-Life/tfc respectively. These 3 .wad files are not comprehensive; you may need textures from one of the other Valve .wad files. Additional Valve .wad files are found in the abovementioned file paths.
With all of your .wad files collected, they will need to be converted into .vtf and .vmt files to be usable in Source. The easiest way to convert these textures is with VTFEdit.
Converting textures with VTFEdit #
Make sure you have the right version of VTFEdit installed, and then navigate to Tools -> Convert WAD File.

In the newly opened window, start by clicking the “Options” button in the bottom left.

Under “General” find the “Resize” section. Here find “Resize Method” and change it to “Biggest Power Of 2”. Source requires the dimensions of textures to be powers of 2; GoldSrc does not have this requirement. Of the three choices for this setting “Biggest Power Of 2” usually gives the best results.

Now exit the options menu and select a .wad file to be converted as well as a relevant folder for the output. Make sure “Create VMT Files” is checked as creating them manually is quite tedious. Because you are having VTFEdit automatically generate the .vmt files for your textures, make sure the output folder you are using is a working materials directory you can use with Hammer. If you generate .vmt files and then move them all to a different folder the .vmt files will be referencing the previous file path, so Hammer will not find them.
Furthermore all of the .vmt files generated will not preserve any of the properties of the original textures in the .wad file. In other words something like a glass texture will not be transparent without designating it as such manually in its .vmt file.
Expect to encounter issues during this proccess. If you are having issue with VTFEdit while converting textures refer to the relevant sections under “Common issues” at the bottom of this guide.
Now is also a good time to convert your skybox textures. Custom skyboxes will be in the .zip file of the downloaded map. Default skyboxes are in Steam/SteamApps/Common/Half-Life/valve/gfx/env and Steam/SteamApps/Common/Half-Life/tfc/gfx/env for Half-life and Team Fortress Classic respectively. Find the 6 .tga files that correspond to a skybox and put them all in a folder somewhere.
Now in VTFEDit navigate to Tools -> Convert Folder and fill out the relevant information in the window that opens. The resulting .vmt files will need to be edited accordingly to work as a skybox in Source. This is process is the same as setting up any other custom skybox for Source.

Converting texture with Xwad #
If you do not want to download VTFEdit, this process can also be done through a program called Xwad. Xwad is a command line application that is part of the Source SDK on Steam(Not 2007 nor 2013). It is found in the bin folder where other development tools are stored. You will need to either create a .bat file or use a terminal to interface with this program.
You will want to use the parameters -BaseDir (location of the game’s folder where gameinfo.txt is stored) -WadFile (location of the .wad file) and -vtex (automatically calls vtex to convert the created .tga files into .vtf files). The combined arguments should look something like this:
xwad.exe -BaseDir [path to gameinfo.txt] -WadFile [path to .wad file] -vtex
Once all your textures are converted, make sure they are in the materials folder of the game you are working with. Ensure your .vmt files reference the correct file paths too.
Converting .map to .vmf #
Make sure you have J.A.C.K. installed. When first setting up J.A.C.K., you will be prompted to fill out install locations of GoldSrc game(s). You do not need to fill this out. The program can still convert the files without this part of setup.
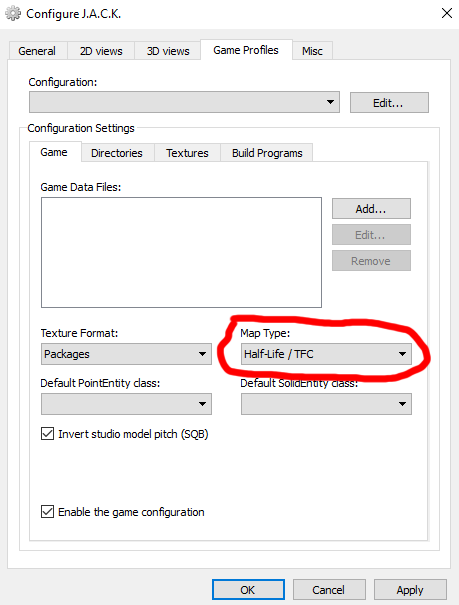
When setup, open J.A.C.K. and either click Tools -> Options, or press F2 in order to bring up the settings menu. In the “Game Profiles” tab, make sure that the map type is set to “Half-Life / TFC” before trying to open the .map file, otherwise the map may fail to load.
Now click File -> Open, and open the .map file you are converting. Once it has loaded, there may be invalid solids that stretch to infinity. Delete these now, you will need to remake them later. Finally click File -> Save As… and save as a “Half-Life VMF”.
Applying textures to the .vmf #
When you open the .vmf file you will see every brush is missing its texture. This is expected and a routine part of the porting process. There are two methods you can use to automatically apply all your textures to the relevant faces.
The first method is to open the .vmf file in any stock version of Hammer 4.x (HL2, TF2, CSS, etc.). Now navigate to File -> Convert WAD to VMT as shown in the image. This operation will scan your materials folder and apply textures to any faces with a matching name. This process goes through your materials folder alphabetically. If you have two textures that share the same name but in different folders, this process will apply the texture from the folder that comes first alphabetically.

Alternatively you can use the optional software GoldSrc2Source for this step. Before running your .vmf file through this program read through each of the options and determine which you would like to use. Generally if you are using this program you want every setting enabled. Hover over the options to read more about them.
Select “Find VMF” to open your .vmf file. Next hit “Repair” and the tool will generate a new .vmf file called mapname_r in the same place as the original file you used. Make sure you remove this suffix from the name of the finalized port. As mentioned in the introduction to this tool, it is not perfect. Do not expect it to fix every problem with your port.

Regardless of method, once the textures are applied some of them will not be aligned correctly. This is due to both the textures new dimensions as well as the strange way some brushes are made by the decompiler. You will have to go through the map checking and fixing all of these textures.
Converting entities #
Now that you have a textured .vmf file you need to fix almost if not all of the entities in the map. Your converted GoldSrc entities will have incorrect or invalid key values and in some cases need to be changed to a completely different entity. This guide will not list every possible entity and its fix. Consult the relevant Valve Developer Wiki page for the GoldSrc and Source entities you are trying to fix.
func_illusionary #
The only problem you should encounter with func_illusionary is that they will appear pitch black in-game. This is due to the FX Color being set to “0 0 0” after porting. Change this key value to “255 255 255” to fix this. If the entitiy was intended to be tinted a certain color, that value should be preserved properly.
func_wall #
Similar to func_illusionary, func_wall will appear black if you do not change the FX Color to “255 255 255”. Additionally some maps used func_wall entities with their FX Amount set to 0 for invisible walls. These should be replaced with regular brushes that use the tools texture, toolsinvisible, or in some cases a clip brush (toolsplayerclip or toolsclip).
light, light_environment #
The brightness values used for GoldSrc will not give you the same result in Source. In general you will need to substantially increase the brightness of every light. Additionally, white lights will be exported as having RGB values of “255 255 128”. While a select few maps have actually intended to use this yellow color for its lights, in almost every case the original light was white. Change the RGB values to “255 255 255” to restore the original white lighting.
The light_environment will also have a similar problem with its color. If you see a light_environment with RGB values of “255 255 128” you almost always should change them to “255 255 255”. The brightness of the light_environment is also going to be too low for both the “Brightness” and “Ambient” fields. Furthermore, the angle of the sun will be listed an as invalid key value. Delete this key value and use this number in the “Pitch” field.
Some maps also used a light_spot pointing at a target instead of a light_environment. This setup should be deleted, and the properties of the light_spot should be applied to a light_environment.
light_spot #
This entity changed between GoldSrc and Source. Inspecting the ported entity will show numerous invalid key values that will need to be converted to the relevant Source equivalents. This entity also suffers from the same color and brightness issues mentioned above for regular lights. Again, consult the relevant Valve Developer Wiki pages if you are struggling to fix and update these key values.
trigger_push #
In general you will want to replace all trigger_push entities with either trigger_catapult or trigger_setspeed, because trigger_push entities are not very consistent. The amount of speed they ultimately give the player passing through can be a bit random.
Regardless of which entity you end up using, ported trigger_push entities will have an “angles” key value that rotates the brush. The value used here is supposed to be used as the push/launch direction. The angles key value will need to be removed completely so the brush itself is not rotated.
Finally, verify that the relevant flags are set for the entity. Typically these are “Clients” or “Everything” depending on the game mode.
trigger_teleport, info_teleport_destination #
The only necessary fix for trigger_teleport entities is to set the “Clients” flag. Momentum Mod also provides additional functionality for trigger_teleport entities such as resetting velocity on teleport. Properly configuring these new settings can improve a map’s gameplay experience.
Consider modernizing the info_teleport_destinations on the map you are porting. Often older maps placed their info_teleport_destination entities high up and far away from the start of a level mainly to prevent players from telehopping and flying off the edge after failing. This is no longer a concern in Momentum Mod. Modern maps will place info_teleport_destination entities 1 unit above the floor, and somewhere between 32 and 320 units before the start of a level.
info_player_start, info_player_teamspawn #
Momentum Mod will use info_player_start—or if not found info_player_teamspawn—to set the player’s spawn. Delete any extra instances of these entities so that only one of either remains in your map.
func_water #
Any instances of func_water entities should be deleted and replaced with Source water. For maps with multiple heights of water in one visible set, use a water texture that does not have reflections. The Half-Life 2 texture, “nature/water_canals03_dx70” is a good replacement in many scenarios, but searching “dx70” in the Hammer texture browser will show some more options.
i_t_g, info_tfgoal, health, ammo #
GoldSrc uses these entities to give players extra health and ammo. These entities will need to be deleted and potentially replaced. Momentum Mod uses its own ammo system via trigger_multiple entities and player I/O. See the Ammo System page for more information. Before you replicate the map’s original limited health/ammo consider if it actually is necessary in the first place. Some old maps have limited health/ammo, yet the restriction has no impact on gameplay. Some mappers only used limited health/ammo because they did not know how to make the entire map have unlimited health/ammo.
env_sprite #
This entity also needs its FX Color set to “255 255 255” if it was originally “0 0 0”. Furthermore, the sprite textures used will need to be ported or swapped to similar looking one. In order to port sprite files you will need to use Xwad. Refer back to the “Converting the Textures” section for more information on Xwad. The command you are looking to execute with Xwad should look something like this.
xwad.exe -BaseDir [path to gameinfo.txt] -SprFile "C:\Program Files (x86)\Steam\SteamApps\common\Half-Life\tfc\sprites\spritename.spr"
Some sprite files may not convert perfectly and will require manually editing the texture itself. Once you have the texture use it like you would any other custom sprite texture. A reminder that by default Hammer hides sprite files when browsing for textures. Either edit the .fgd file to make them show up or manually enter the name of the file into the relevant key value of the env_sprite. In other words manually fill in the “Sprite Name” key value with sprites/my_sprite.vmt
func_rotating, func_door_rotating #
These entities will be accompanied with a green cube using the “origin” texture on every face as seen in the image below. In GoldSrc this was used to designate the point of rotation. This should be removed as this is now handled in the entity’s key values. Make sure to remove any other invalid key values and change the Source equivalent key values to recreate the original behavior of the object.

ambient_generic #
GoldSrc sounds usually are compatible with Source without any modification. Setup any GoldSrc sound like you would any other custom sound to use in your map.
models and props #
Models in GoldSrc do not work in Source by default. They will need to be decompiled, edited, and recompiled to be used in your map. See the below guide from the Crowbar Steam Group for instructions on porting models, as well as solutions to common problems with the process.
Tutorial: Porting GoldSource models to Source Engine using Crowbar for Dummies and Newbies
Other common issues #
Using SLADE to fix .wad files for VTFEdit conversion #
Occasionally VTFEdit will stall on or fail to convert certain textures in a .wad file preventing the operation from finishing. If this happens the .wad file must be edited to remove the offending texture. This can be done with SLADE.
Install SLADE and Open the troublesome .wad file.

Read the output log of VTFEdit to find the texture causing issues; it is likely the last texture named. Select and delete this texture in SLADE and then save the .wad file. Repeat this process if VTFEdit stalls during the conversion again. In the image below the “NULL” texture cannot be converted, so it is selected for deletion.

The conversion of large wad .files in particular is prone to stalling. To remedy this, after the first stall in the conversion process note the last texture converted. Open the .wad file in SLADE. Now delete from the .wad file every texture that has already been converted. Save the .wad file and then continue the conversion. Repeat this process until you have all of the textures converted.
VTFEdit grayed out convert button #
Sometimes the Convert button in VTFEdit is grayed out despite the sections for both the .wad file and output folder being filled out. If you just opened VTFEdit, first try reselecting both the .wad file and output folder. Otherwise this problem is likely occurring because of either the special characters used in one of the specified file paths, or potentially one of the file paths is too long. Try placing the .wad file somewhere with a short, simple file path (e.g. root directory, desktop) and specifying a similarly simple file path for the output folder.
Missing clip brushes/invisible walls #
The decompilers are not capable of exporting clip brushes. You will have to go through the original map in-game and find where these should be to recreate them. This is easier if you are already familiar with the map and its game mode. As mentioned previously in this guide, any func_wall entities being used as invisible walls should be replaced with world geometry using either of the toolsinvisible, toolsclip, or toolsplayerclip textures.
Tiny holes in geometry #
The decompilers will often make tiny 1 unit or smaller holes in surfaces around or in complex geometry. Wherever you see a hole into the skybox/void you will have to remake the brush.
Brushes with a light texture used for texture lights look too dark #
If you are using a texture for a texture light that you want to appear bright and lit up you should use the “UnlitGeneric” pixel shader in the texture’s .vmt file. Below is an example.
"UnlitGeneric"
{
	"$basetexture" "tfc/~LIGHT3D"
}
Random black brush faces #
In any map with angled geometry you will likely find some faces of world geometry are black, while the rest of the surroundings are properly lit. An example of this scenario is shown in the image below. Note how the sand texture turns to black.
When this occurs start by remaking the problematic brush ensuring all of its vertices are on grid. If this does not fix the issue do the same for any other nearby complex geometry. In general if you find a brush with a dimension that is not a whole number (e.g. 63.845), you should remake that brush.

Map is dark or otherwise unlit #
Map wide lighting problems are usually due to one of two issues. One reason is that your map originally used texture lights. Texture light information is not saved from the decompile. You will have to go through the map, look for textures that look like they would emit light and then guess both the brightness and color.
Otherwise try increasing your lightmap scale. Somewhere between 16 and 64 works for almost every map. When using texture lights this value will likely need to be on the higher end of this given range.
Blue outlines on semi-transparent textures #
Textures partially made up of transparent sections will have an undesirable blue outline. This can be faintly seen around the holes in the fence texture in the provided image.

The easiest fix is to find a comparable texture to replace it with. Fortress Forever in particular has numerous remakes of Half-life/Team Fortress Classic textures that serve as acceptable replacements. Otherwise the texture must be manually altered in your image-editing software of choice. The following paragraph should give you a better understanding of the problem to help you with fixing it.
The transparent pixels of a texture still store color data. The blue halo effect you see on textures with transparent parts is because those transparent pixels are still blue. When the game engine smoothes out the pixelated texture it draws from the colors of nearby pixels. This is where it finds the blue halo from. GoldSrc would interpret this blue as transparent. To fix this, color the transparent pixels with the average color of the rest of the texture and then make them transparent again. This will require some trial and error.
Excessive compile time #
Maps should not take more than a few minutes to do a full compile. If VVis is taking too much time during the compile process go through the map and opitmize it. This means adding complex geometry to a func_detail entity, or placing func_viscluster brush entities in areas with large numbers of visleaves.
Finishing up #
If you have made it this far you should now have a complete or nearly complete port. Go through both your port and the original GoldSrc version ensuring you are satisfied with the result.
Before releasing your port consider trimming down the map’s name to something more modern. For example, concmap_mymap123_a3 could be shortened to conc_mymap123. This is necessary if your plan is to port the map for Momentum Mod. Depending on where you publish your port consider reusing the map’s original info text file to provide a description and original release date. If you cannot find the original release date, but see that the original .bsp file was last modified over 10 years ago, the last modified date of the file is likely close enough to the map’s actual release.
Ultimately porting a map this way is not perfect. If the map plays well and there are no obvious visual issues do not hesitate to call a port finished; do not stress about any insignificant issues most players will never notice.
Credits #
Zike1017 - Primary Author Panzer - Some images, Xwad information Ryan “Nemesis” Gregg - Old technical explanations related to decompiling and porting Sam Vanheer - Author of the Half-Life Unified SDK map decompiler and technical explanations